SQ Stitch is a new app to help you stitch a Scarlet Quince pattern. The most important feature is that as you mark stitches complete, it highlights all nearby stitches that are the same symbol. No more cutting the thread and then noticing one more stitch you should have done. You can also search for a symbol without marking a stitch complete, and display the colors used in a symbol just by touching it.
It also keeps statistics about your stitching, and you can enter notes. There are bulk stitch modes to make it quick to transfer markings from a paper pattern.
And it runs on almost all computers, tablets, and phones.
SQ Stitch is a web app, which means that it runs in a browser. (In other words, it's a web page.) The software itself is never installed on your device, so you will need an internet connection when you start it. [This may change in the future.]
The address is https://www.scarletquince.com/SQStitch/. Most browsers have a way to save a page to the desktop and we recommend you do this so that SQ Stitch is easy to access.
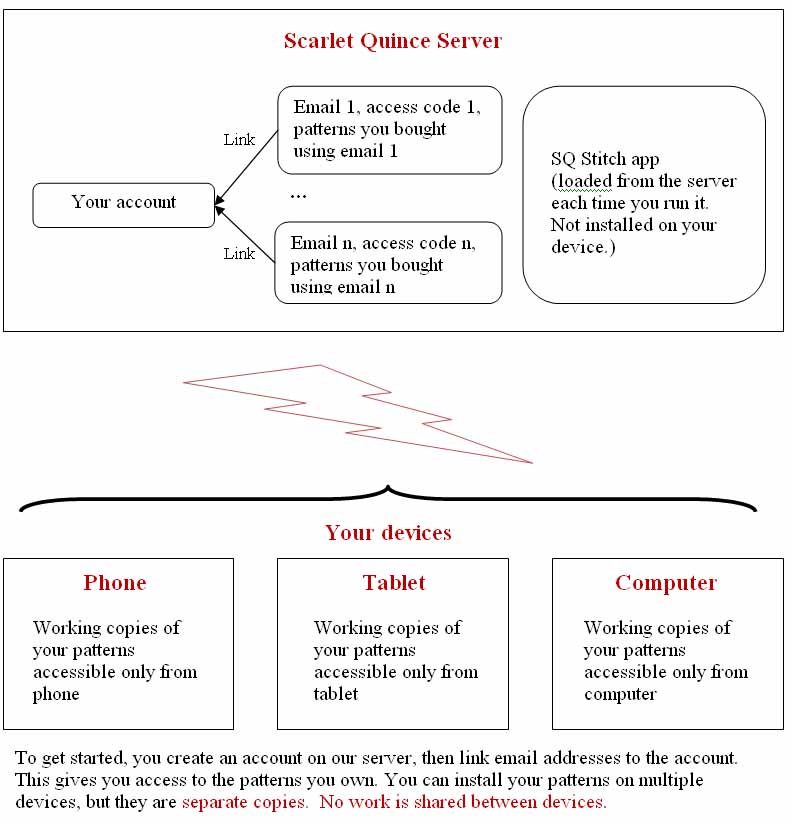
The data SQ Stitch uses, your cross stitch patterns, is stored on your device, within the browser you choose to use. You may install a pattern in more than one browser but they will not share data. Any changes made in one browser do not carry over to any other.
This is also true across devices. You might install a pattern in Chrome on both your laptop and a tablet, but again, they do not communicate. We are aware that some people might prefer to have their data in the cloud so that they can stitch using whatever device is handy, and we will look at that for the future, but for now, you should choose a device/browser combination and stick to it. There is backup and restore functionality to move your work from one device/browser to another but it's not something you would want to do constantly.
As a web app, SQ Stitch will work on most devices/browsers, provided that support for the local database exists.
The following diagram may clarify where various things are stored and when an internet connection is needed.
You must not be in private or incognito browsing mode. By definition, all data is deleted at the end of such a session. In some environments, you'll see an error message if you are in private mode, but in others, the app will store your data and silently delete it at the end of a session.
The instances in which it may not or will not work are:
It is also possible, particularly with older browsers/devices with low data storage limits, that the browser will delete your data without asking. It is important to do regular backups. The procedure is explained under The Data Tab. You should always do a backup before updating your system software.
Another caution: over the years, there have been some changes to the symbols used in our chart keys. (The colors themselves have not changed, just the symbols.) If you bought your chart before 2008 (or might have), you should check the key in SQ Stitch against your printed chart. If there are mismatches, see The Key Tab for how to make the keys match.
You can use SQ Stitch with any Scarlet Quince pattern (whether you have a printed or electronic copy). We will email everyone whose purchases we have a record of an access code, and going forward access codes will be included in the shipment confirmation emails we send.
If you have a Scarlet Quince pattern that you bought from Amazon or another retailer, that's OK -- get in touch with us. We will ask you for proof of purchase, and a snapshot of the pattern is fine. Also, if you bought your pattern from us but didn't get the email with the access code, get in touch.
To get started with SQ Stitch, go to https://www.scarletquince.com/SQStitch/. The basic setup process is this: you'll create an SQ Stitch account, then log in and link your email(s) to your account. Please note that even if you have purchased patterns under several different emails, you need only one account. All the data about your account and which patterns you own is stored on the Scarlet Quince server, so even if something happens to your device, we still know what you own.
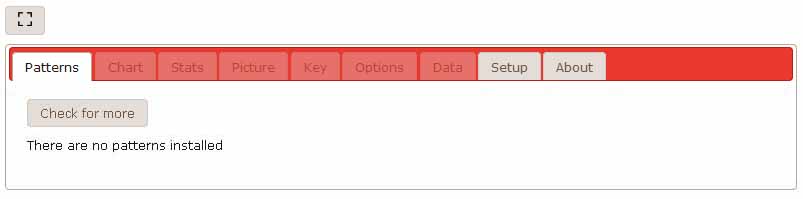
The SQ Stitch functions are organized into several tabs. It opens with the Patterns tab active, and the screen initially looks like this:
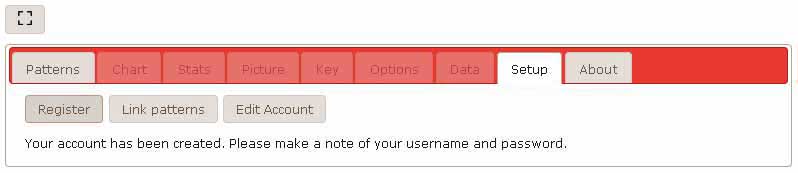
Click on the Setup tab. There are three buttons, Register, Link, and Edit Account.

Click the "Register" button to create a SQ Stitch account. A dialog box appears.
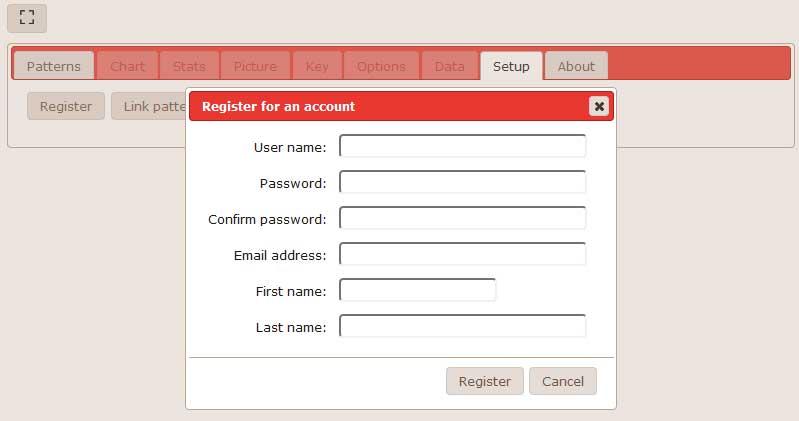
You should choose a user name you can remember. You can reset the password if you forget it, but you'll need your user name to do that. The email address is where you would like password resets to be sent. It isn't used for anything else, and doesn't have to be an email address you've used when buying patterns. The user name and password are case-sensitive.
We ask for your real first and last name as an aid to us in getting you connected to all of your patterns that you may have bought using a variety of emails or phone numbers.
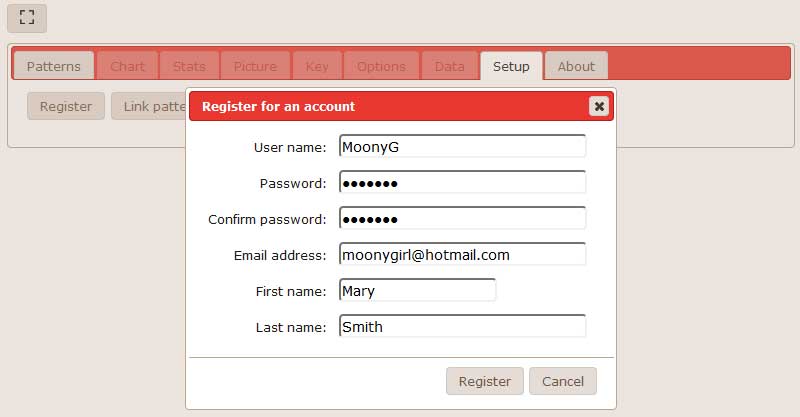
After you've filled in the form, click the Register button.
If there are any errors, such as the user name you chose is already taken, the dialog box will stay open and show you the error messages. Otherwise, you'll see this:
Now you are ready to link your purchases to your new account. Click the Link button. Another dialog box will appear.
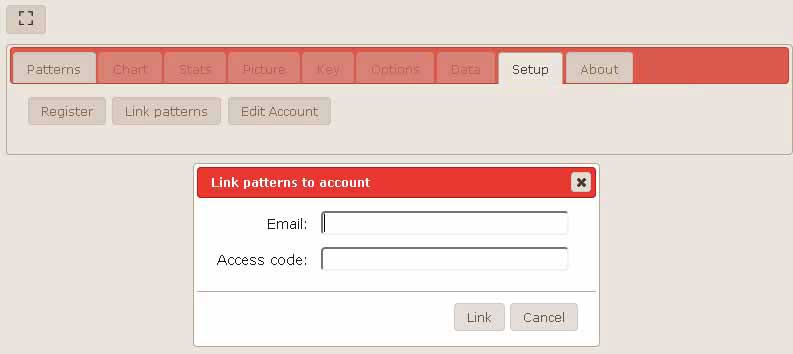
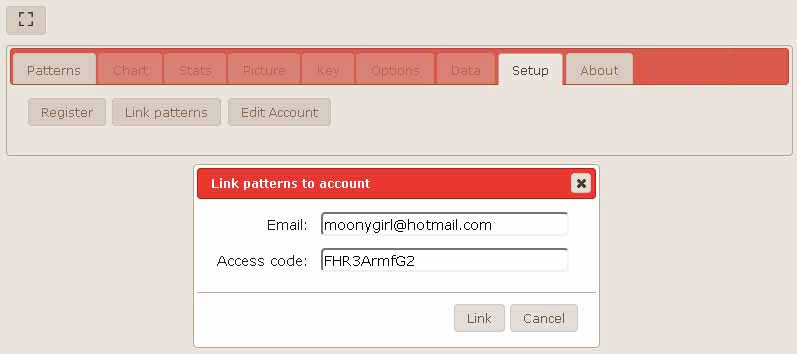
Here, enter an email address and access code. (These have been emailed to you. If you didn't get the email, get in touch with us.) It doesn't matter if the email address is one you no longer use. You must use the email address specified in the body of the email -- it alone is associated with the access code in the email.
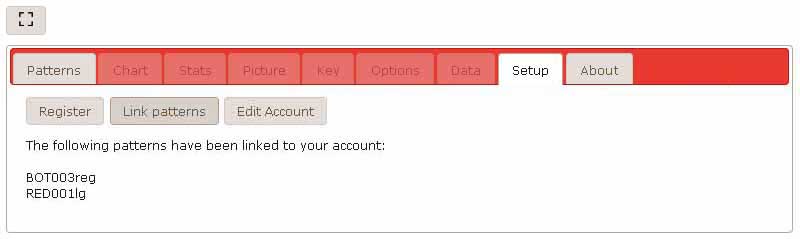
Click the "Link" button. You'll see a screen showing the patterns that were purchased with that email address. These are now associated with your account. Note: the connection between your account and an email address only has to be done once. It's stored remotely so you can change devices without having to repeat this step.
If you have more email addresses and access codes, click the "Link patterns" again.
Finally, the "Edit Account" button allows you to change your contact email or password. When you click it, you'll see this dialog box:
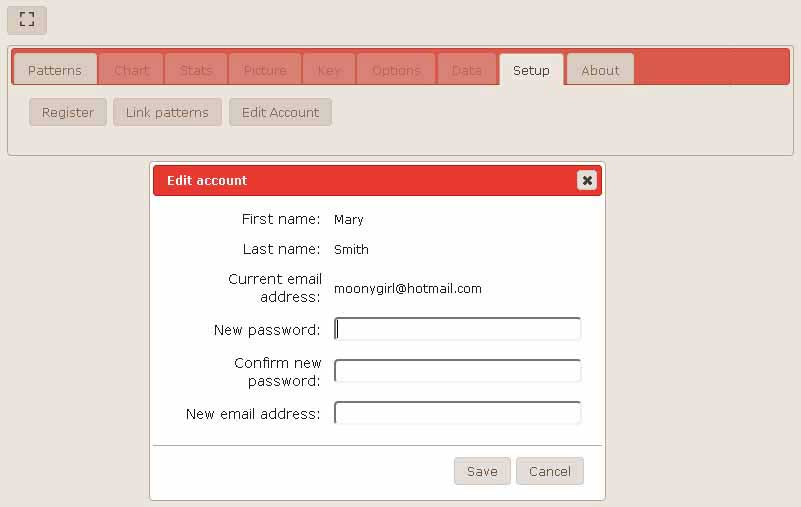
You can change your password or contact email or both.

If the operation was successful, you'll see this message:

The setup functions all store data on our remote server. If you go more than 15 minutes without contacting the server, you'll be logged out (silently). If you try to link patterns or edit your account when you're not logged in, you'll first see a login dialog box:
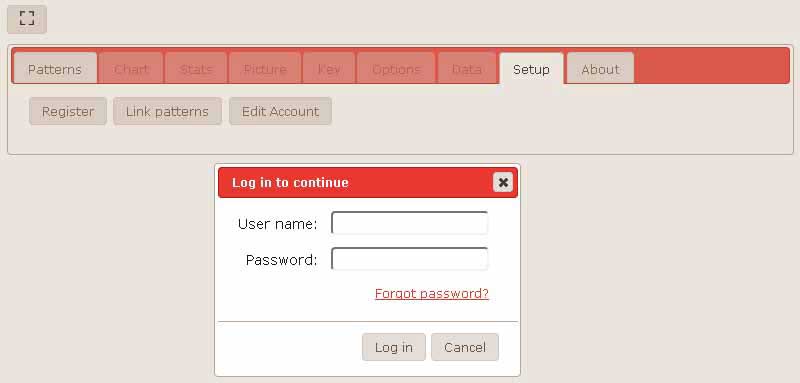
Fill in your user name and password (they are case sensitive) and click "Log in".
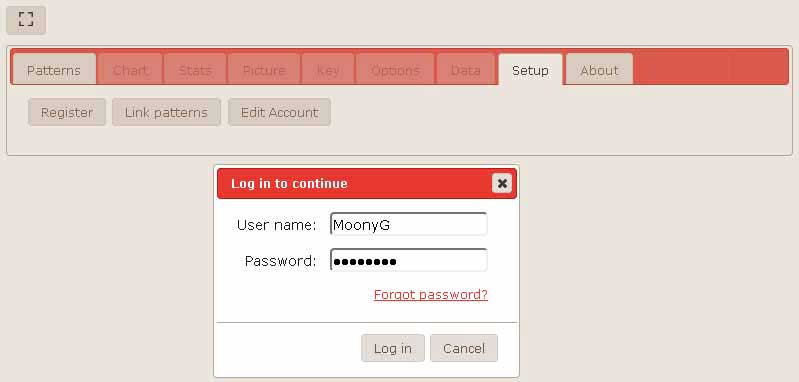
When you've logged in, SQ Stitch will proceed with the process you originally requested. Don't worry about getting to the login dialog box; it will find you when it wants you.
Now you're ready to begin installing your patterns.
Initially, the screen looks like this: (known issue: it works better in landscape mode). You start on the "Patterns" tab, and other the tabs (except Setup and About) which deal with specific patterns are disabled.
The "Full screen" ![]() button will get rid of tabs and toolbars at the top of your browser, if the platform supports that. (iOS does not.)
button will get rid of tabs and toolbars at the top of your browser, if the platform supports that. (iOS does not.)
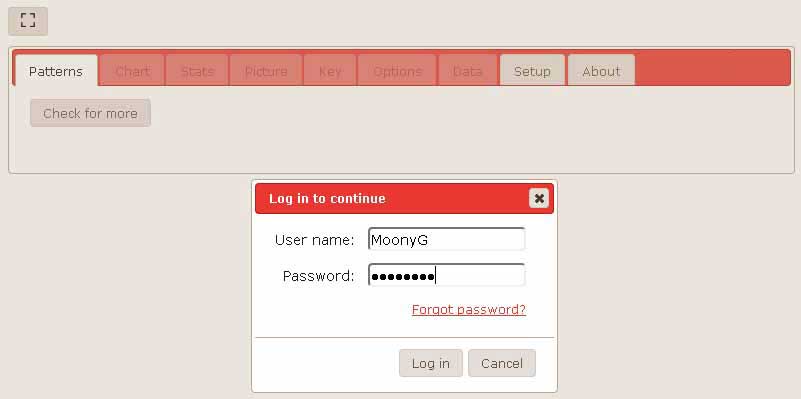
Click "Check for more". If you're not logged in, the login popup will appear and you must log in. (If you have forgotten your password, enter your user name in the login dialog box and click the "Forgot password?" link. This will send an email to the email address associated with your account that will allow you to reset your password. If you have forgotten your user name, get in touch with us.)
A list of your patterns will appear. (Known issue: the current implementation is not ideal if the list is long.)
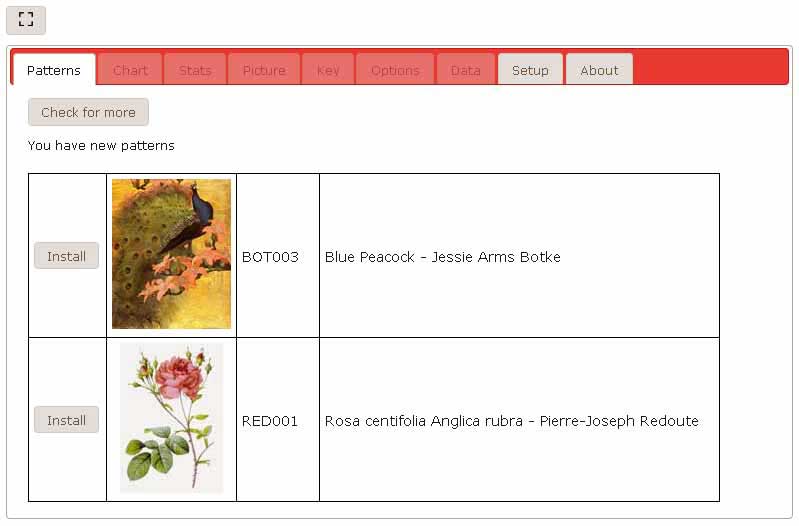
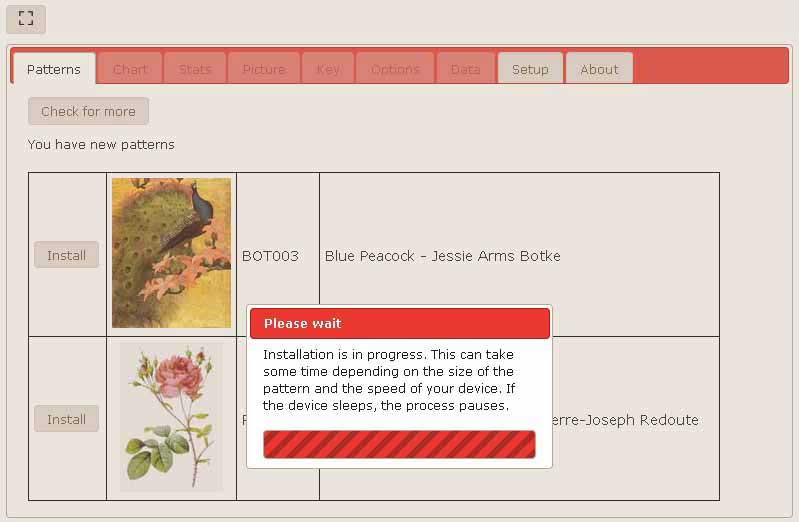
Click an install button next to a pattern you want to install. This will download the pattern data from the Scarlet Quince server and install it in your browser. It can take anywhere from a few seconds to several minutes. If you allow the screen to go blank, the process will pause, so keep an eye on it or change the sleep time.
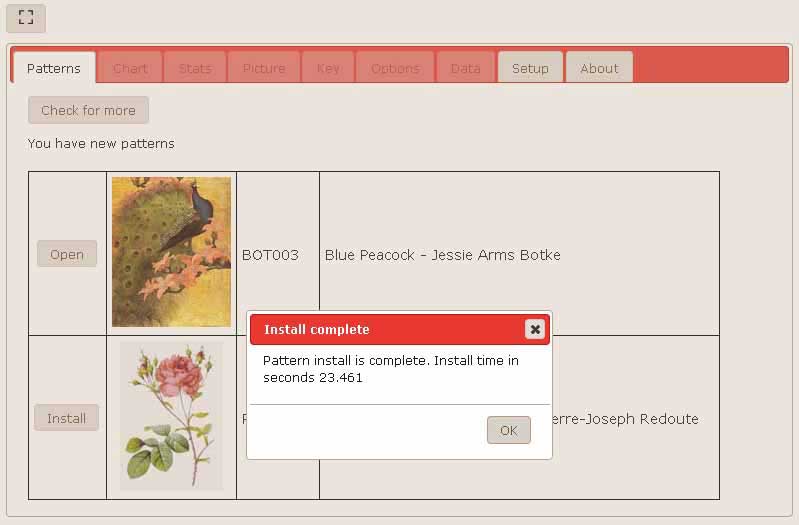
When the installation finishes, the "Install" button changes to "Open". You can open the pattern or install others.
When you click the "Open" button, your pattern opens and you are taken to the "Chart" tab, in the upper left-hand corner. (As you move around in a pattern, SQ Stitch remembers where you were last stitching, so when you open the pattern, you are positioned in that location.)
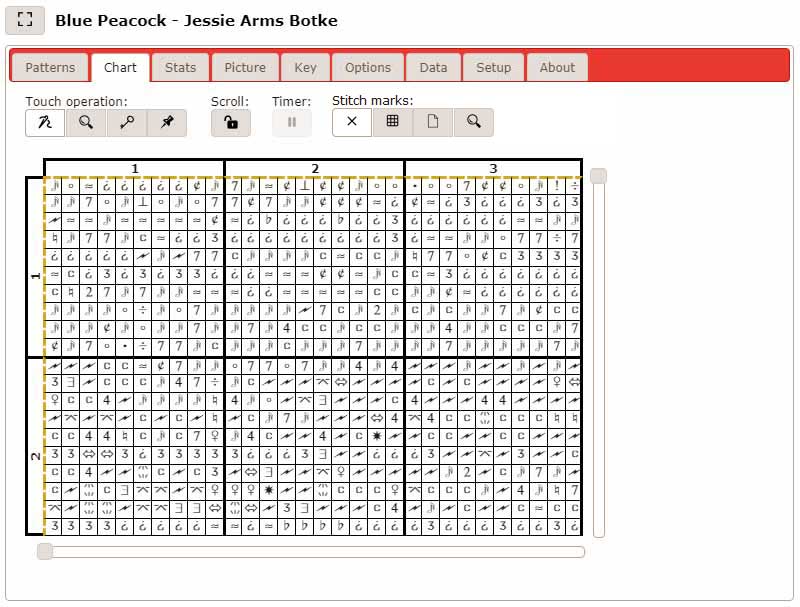
By default, the initial viewport is 30 x 20 stitches. You can change this on the Options tab.
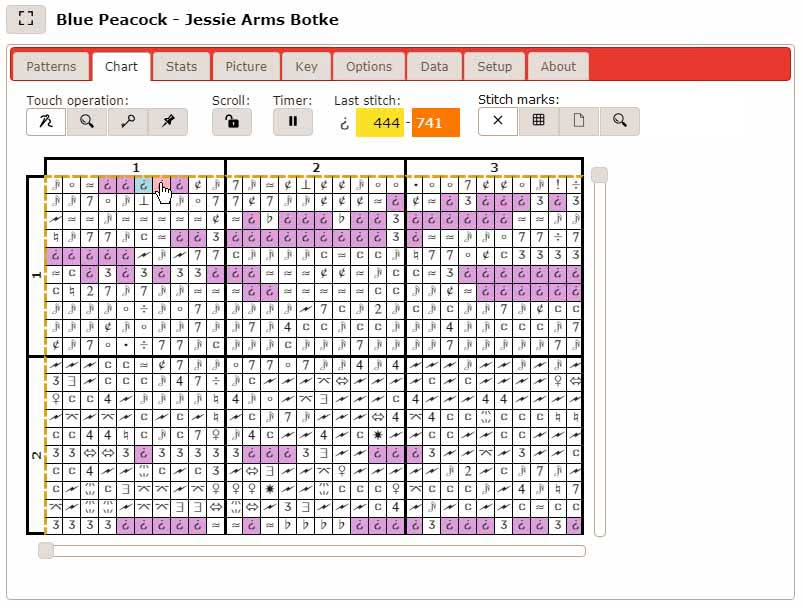
The first control, "Touch operation" controls what happens when you touch a stitch.
In stitch mode (the needle and thread icon), when you touch a stitch, it's marked as complete. If you touch the wrong stitch, touch it again to erase the marking. Also, all other occurrences of that symbol are highlighted. (You can change the colors used on the Options tab.)

By default, the highlighting stays on for 5 seconds and then goes off. You can change this on the Options tab. If you set it to 0, the highlighting will stay on until you do a different search, or touch the magnifying glass (search) button twice in a row. The colors for the completed and searched stitches can also be changed on the options tab.
Also, the key information for the last symbol sttiched is added to the header. Finally, the timer pause button becomes active. Once you start stitching, your time is measured. If you are going to take a break, pause the timer to get more accurate statistics. (If you go a certain period of time, settable on the Options tab, without taking a stitch, the timer will pause automatically.)
Another Option is to mark the last stitch completed in a different color. Here we've used pink. The last stitch made will stay pink until you complete another stitch, at which time the current pink stitch will turn blue and the newest stitch will be pink.
You can also search for a symbol without marking anything complete by going into search mode (click the magnifying glass button).
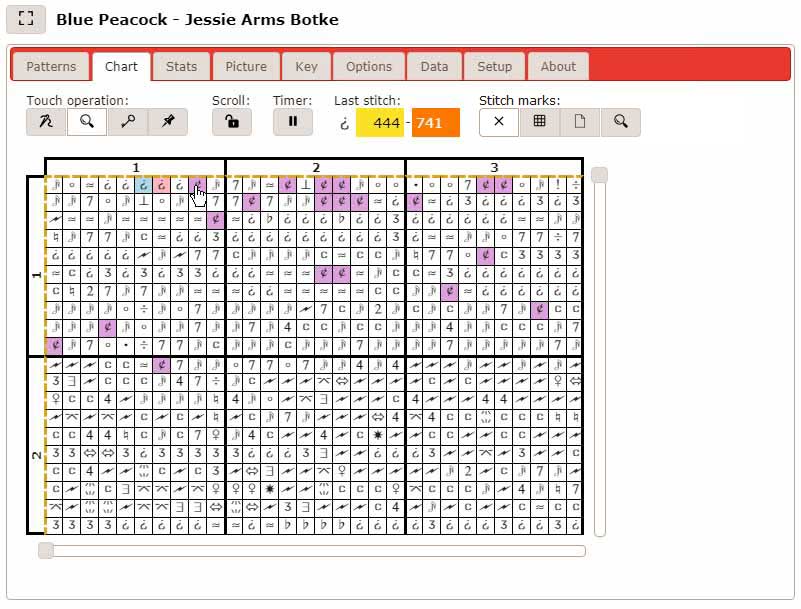
In key mode (the key icon), the key information for the touched symbol appears.
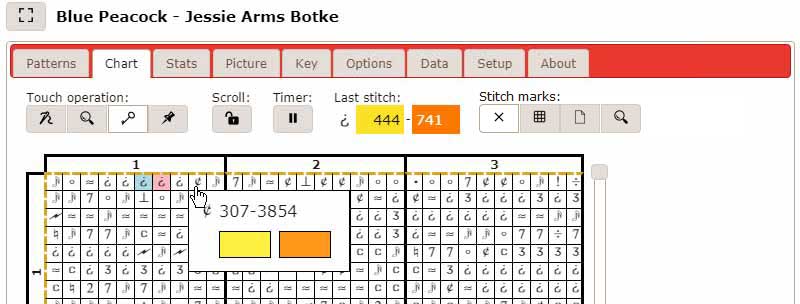
This also disappears after a few seconds, or when you change the mode, or when you touch the key popup.
The last key mode (pushpin icon) is for marking stitches. A marked stitch can mean whatever you want it to mean. You may use it to mark parked stitches, stitches you are planning to make, perhaps stitches you think are mistakes, or anything else you can think of. The color for marked stitches overrides the other colors. For example, if you mark a finished stitch, the color will change from the "finished" color to the "mark" color. The stitch is still finished, and if you unmark it, it will go back to the "finished" color. Marks are remembered from session to session.
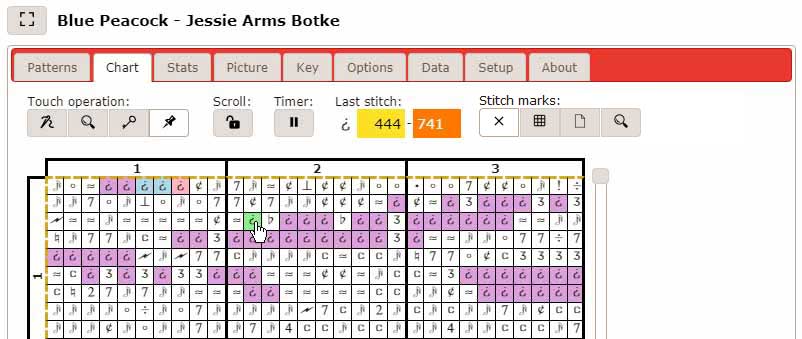
In the above example, the pink stitch has just been marked complete and all the other inverted question marks are highlighted in purple. We've then clicked the "mark" button and marked one of those symbols. It will stay marked after the search disappears.
The scroll lock button controls whether the scroll bars are locked or not. With a touchscreen, it's easy to brush the screen with your hand and find yourself far from where you are stitching.
The key for the last stitch completed is just information. It doesn't do anything.
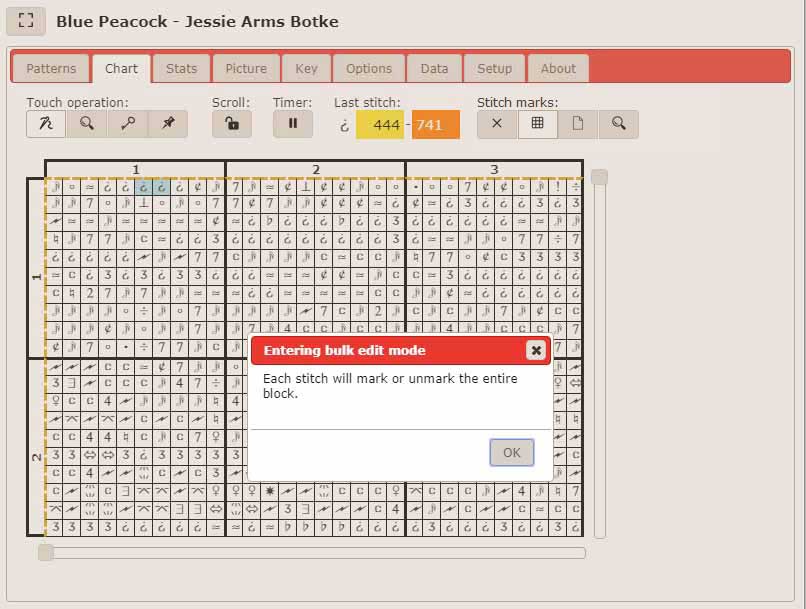
The final control, "Stitch marks" determines how many stitches are marked or unmarked when you touch a stitch in stitch mode. The normal mode is 1 stitch at a time (the x icon).
If you are transferring markings from a printed pattern, block mode (the grid icon) and page mode (page icon) are helpful. In block mode, touch any unfinished stitch in a 10 x 10 square, and the entire square is marked as finished. Or touch any finished stitch and the entire square is cleared.
Page mode works the same way but marks or clears an entire page. You may notice some delay when marking a lot of stitches at once.
You can minimize your clicks when transferring markings from a printed chart by being careful about the modes. If you have more than half of a page finished, mark the whole page as done and then go to block mode and rip any blocks that aren't finished. Similarly, if a block is more than half done, mark the block complete and then subtract the stitches that aren't done.
You will not use block and page mode in normal stitching, so to prevent large mistakes, when you touch one of those controls, a warning will appear. If you didn't mean to be in block or page mode, click OK on the dialog box and go back to single-stitch mode.
There is also a mode for marking all searched stitches as complete (the magnifying glass icon). If you like to stitch all of a symbol and then mark those stitches complete, this will be faster than marking one stitch at a time.
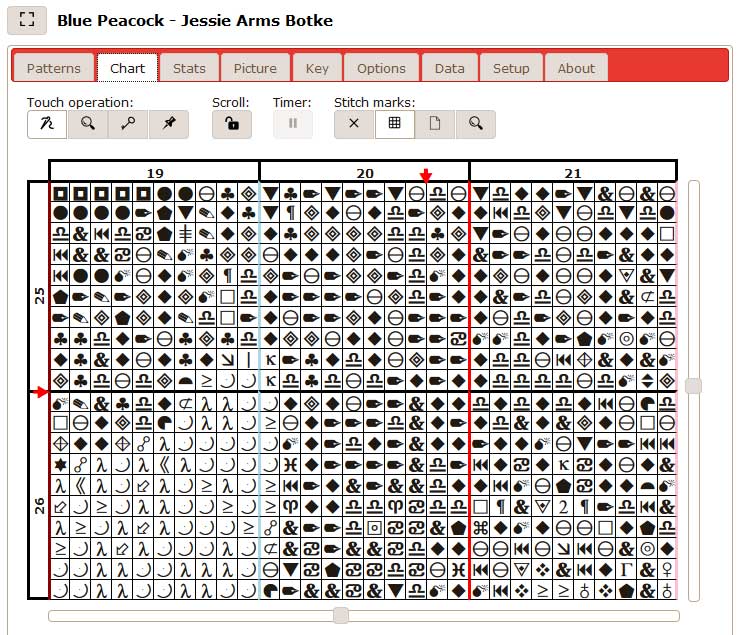
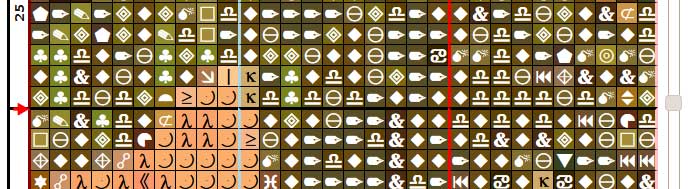
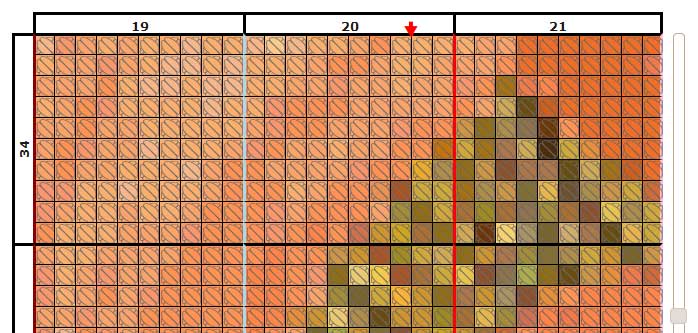
The dashed lines on the chart are page boundaries. You can have regular or large print demarcations, or turn the boundaries off (controlled from the Options tab). The default color is gold but you can change it on the Options tab.
Drag the scroll bars to move through the chart. You can only move in 10-stitch increments. (There is another way to move using the Picture tab.)
The stats tab shows your stitching statistics, initially by day. The statistics accumulate as you stitch, and the data kept for each day is the time of your first stitch, the time of your last stitch, net stitches completed (this is stitches made minus stitches removed, so if you have a bad day it can be a negative number), and total (elapsed) stitching time. Any time you go more than 5 minutes without marking a stitch complete, the app assumes you took a break and doesn't count that time in the total. For example, if you stitch for 3 minutes, stop for 3 hours, and then stitch for 3 more minutes, your start and stop times will be about 3 hours apart, but the total time will only be 6 minutes. Your average stitches per hour for the day is also calculated.
The percentage complete you are on this pattern is also shown but you may have to wait for it to appear the first time you visit the stats tab, since it takes some time to calculate. (Note: stitches made in bulk mode are not counted toward a day's statistics, but they do count toward the percent complete.)
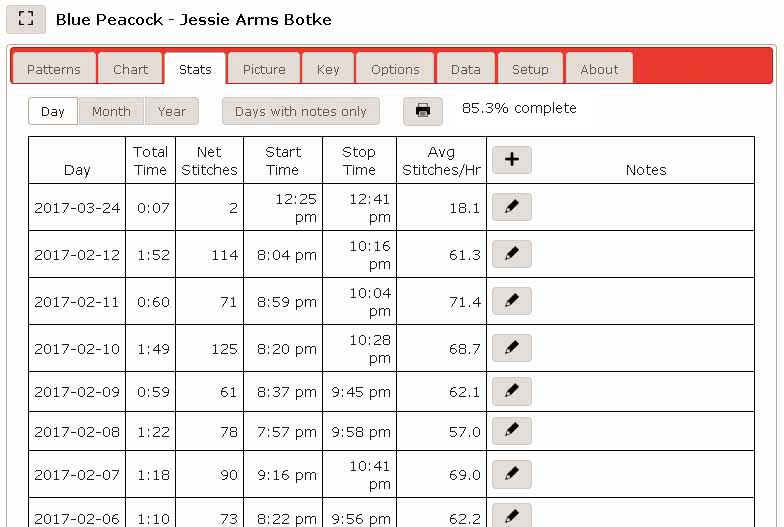
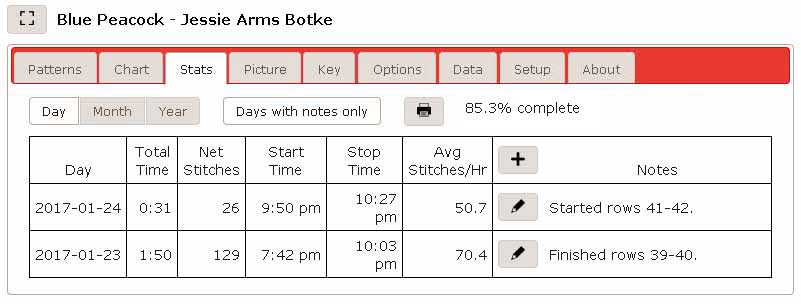
It shows the most recent 30 days of stitching. If there is more data than that, there is a "More" button at the bottom of the list. You also have the option to show only days with notes, again up to 30 at a time.
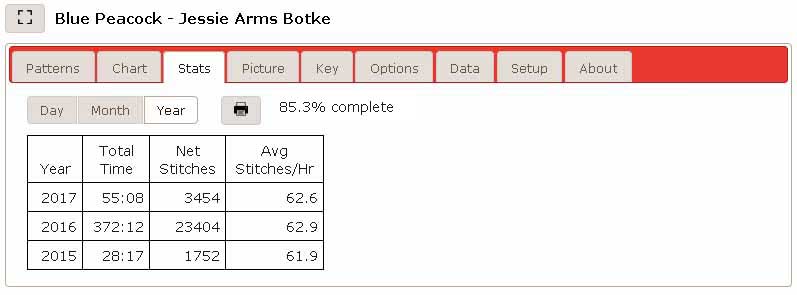
You can also see your data summarized by month (12 months at a time) or by year (all data). Summary views can take longer.
You can print any of the views (day, days with notes, month, year) and it will print the full set of data, but without the plus and pencil buttons.
To add or edit a note for a date that has stitching data, click the pencil button. You'll get a popup, with the existing note if there is one. You can enter or change your note, then click the "Save" button to record it. If you want to remove a note, click the pencil, clear the note, and then click "Save".

To add a note for a date without stitching data, click the + button in the stats table header.
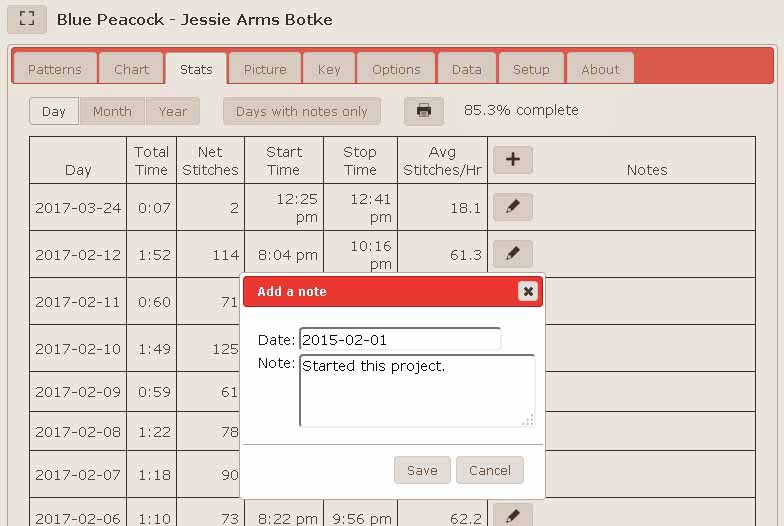
You'll get a popup, this time with a date field. When you cick on it, a date picker appears. You can also type the date, but it must be in the format yyyy-mm-dd. Enter your note and click "Save". There is no limit on the length of a note.
The picture tab shows you the picture of your pattern at a scale of 1 stitch = 2 pixels x 2 pixels.
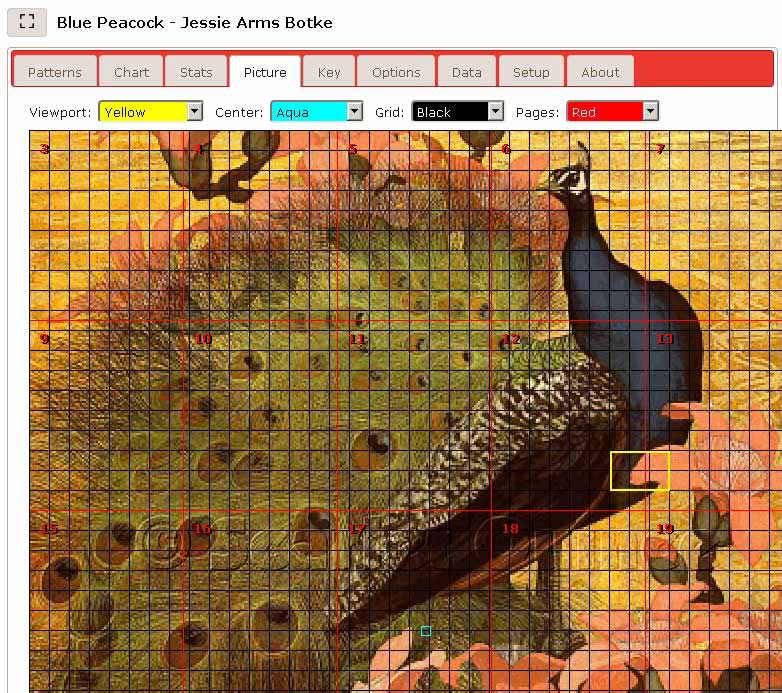
There are 4 controls at the top of the page to change display options:
The viewport (initially yellow) shows the section of the pattern that is currently visible on the chart tab. You can move around the pattern by dragging it. (When you release it, it will snap to the nearest block boundaries.) If you want to find a particular page, the easiest way is to turn the page bounds on and drag the viewport to that page.
If you want to move to the center of the chart, drag it so that it encloses the center square (initially aqua). When you return to the chart tab, the center point will be indicated by two red arrows in the pattern margins. The point where they would intersect, if extended, is the center of the chart.
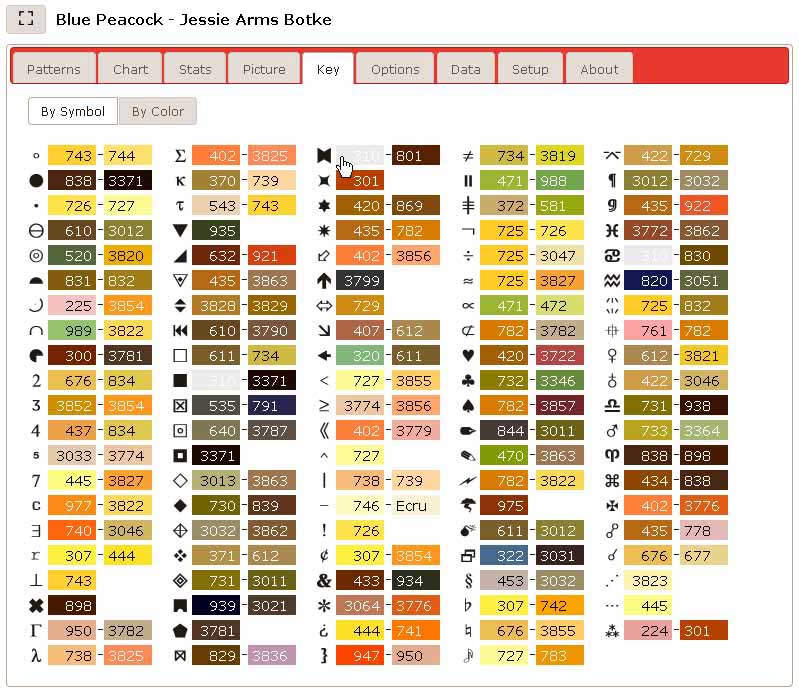
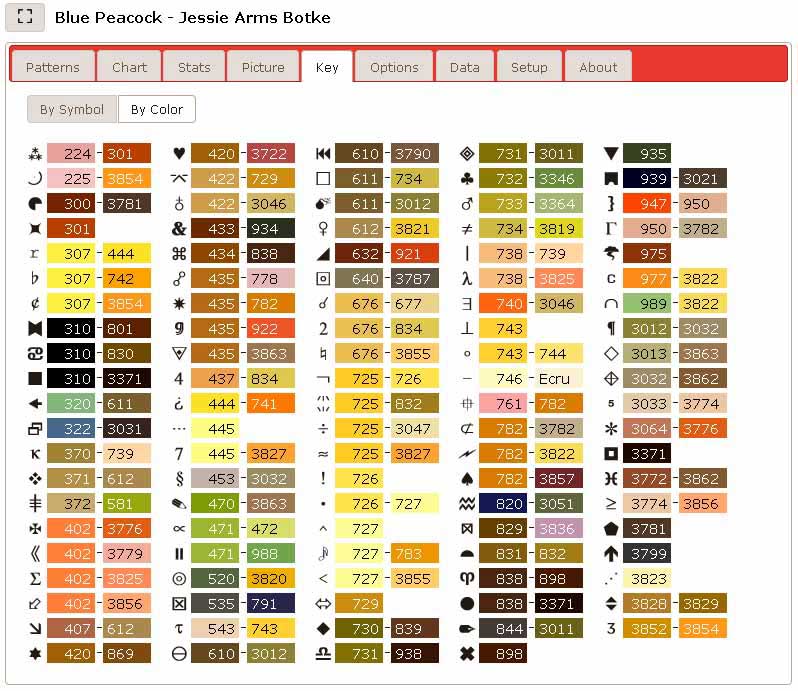
The key tab shows the pattern key as it appears in our printed charts, organized by symbol type (circles, then numbers, etc.) Each color number shows the floss color.
If you click on a color swatch, say 310, it will begin blinking, along with all the other occurrences of 3863 in the key. This allows you to see which symbols use a given color. The picture below shows 310 (black) in mid-blink.
If you click on a symbol, a dialog box appears that allows you to change the symbol to a different symbol.
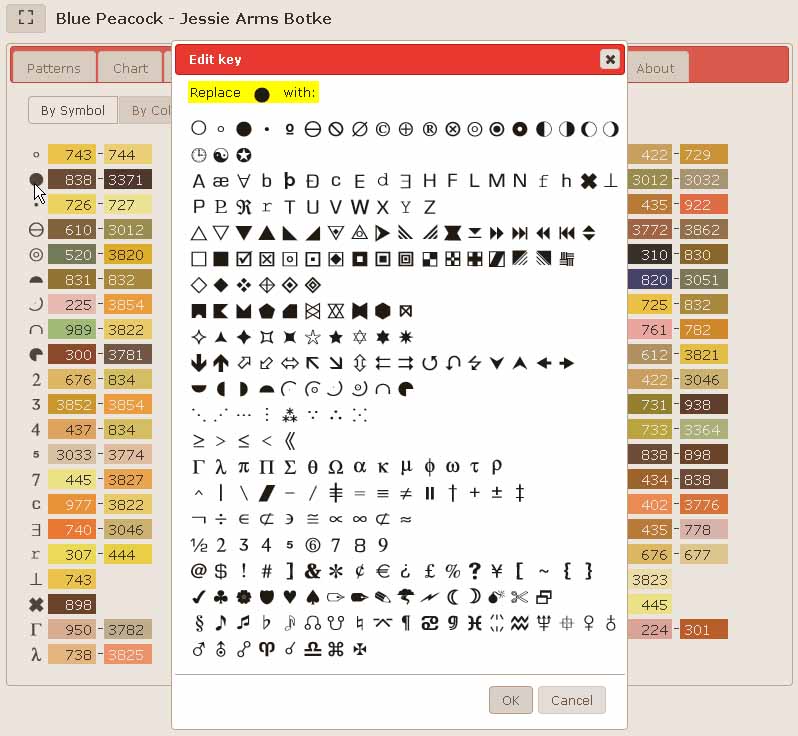
This feature is provided in case you have an old chart (pre-2008) and its key doesn't match the key in SQ Stitch. If you find that the keys are different, you should change the keys using the following procedure.
Click the "By Color" button to sort the key by color number.
Then go through your printed key one symbol at a time. Suppose the first symbol in the printed key is a small hollow circle, with colors 743-744. Go to the SQ Stitch key and look for 743-744. Suppose its symbol is a triangle, instead of the small hollow circle. Click on the triangle to bring up the dialog box, find the small hollow circle on the dialog box, click it to highlight it, and then click the OK button. Continue on through the printed chart, checking each symbol and correcting it if necessary. Don't worry if you make a mistake; you can just keep editing symbols until the keys match. When you think you've made all the corrections, return to symbol order by clicking "By Symbol" and have a quick comparison of the two keys.
You can also change a symbol if you find it too similar to another one, or if you find it hard to see, or just hate it on principle.
The options tab lets you set your preferences for various things applying to stitching in general or to a particular pattern. It is organized into several groups of related options.
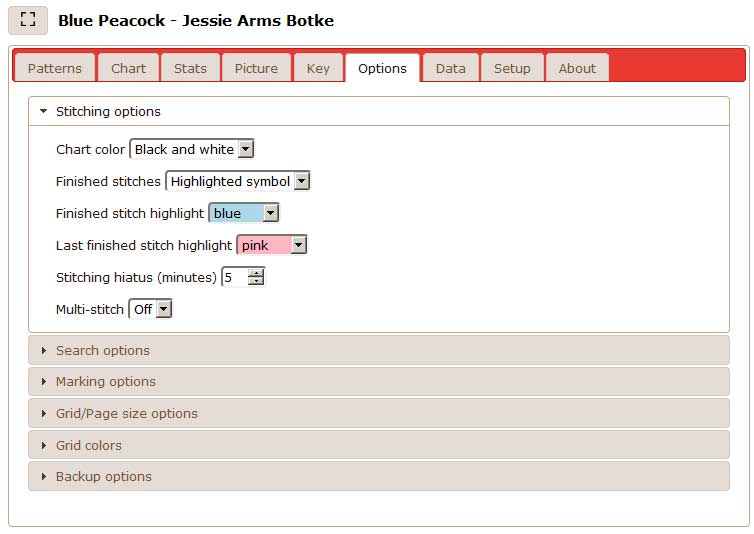
Initially, the Options tab shows the stitching options group. Click any of the other titles to open that section. Stitching options include:
It's possible to have both finished stitches and stitches to do in color, but it makes it harder to see which stitches are finished and which are not.
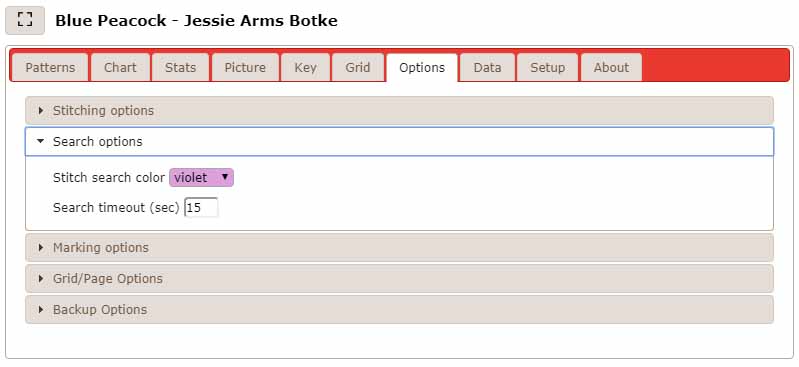
Search options include:
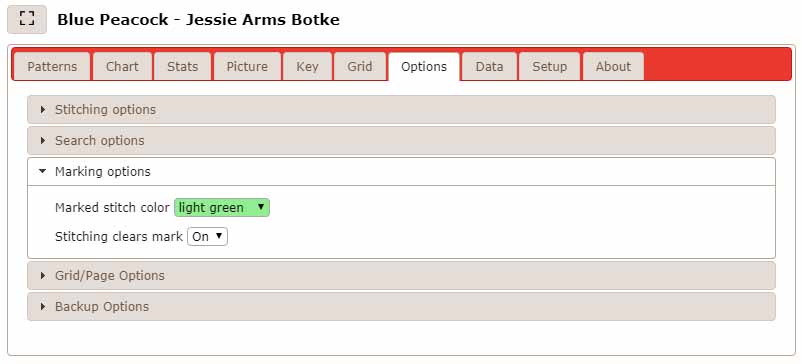
Marking options include:
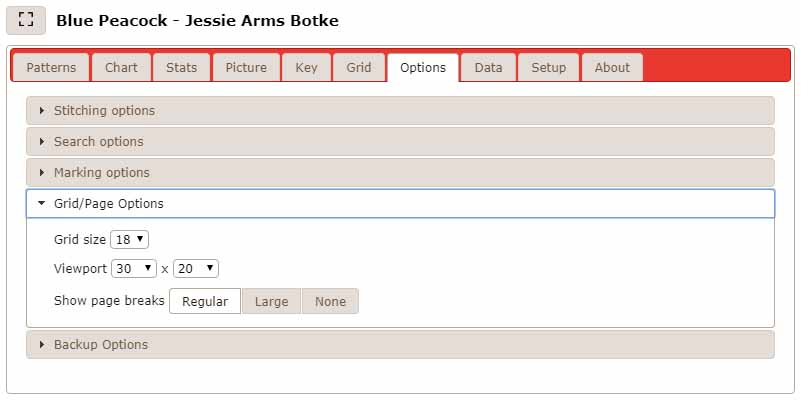
Grid/page options include:
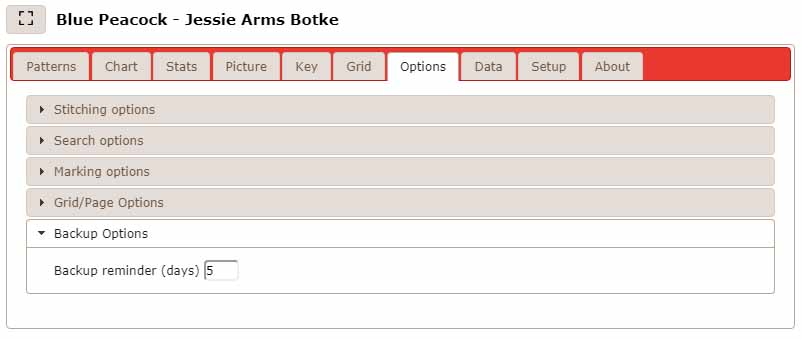
Backup options has just one setting:
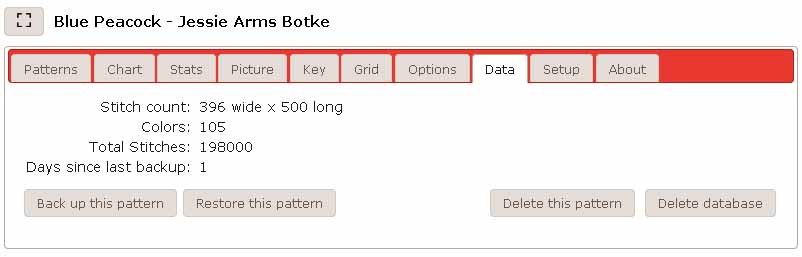
The data tab provides some information about the pattern and a few bulk data operations.
The "Back up this pattern" button allows you to save a snapshot of your completed stitches, statistics, and any options or grid colors you've changed from the default. You should make a backup periodically just in case something happens to your device or your data, or if you are planning to transfer your stitching to another device. Here's how.
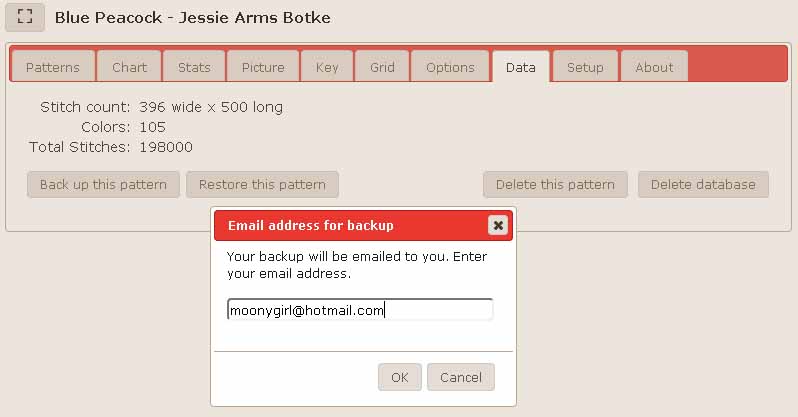
When you click the button, you'll be asked for an email address to send the backup to. (It doesn't have to be the contact email for your account.)
While the backup is running, a "wait" dialog box is shown.
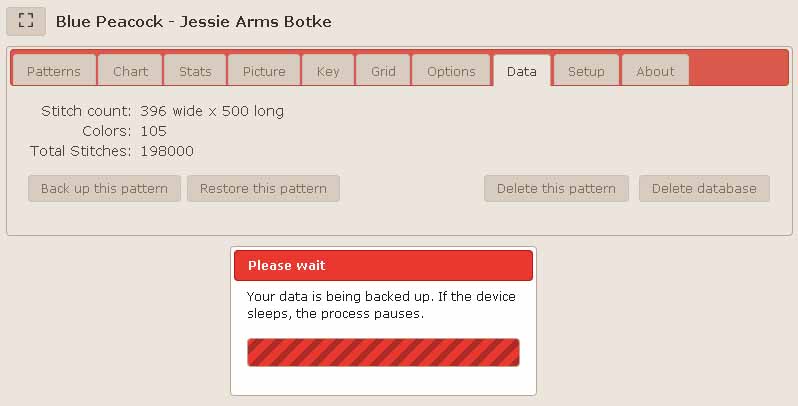
When the backup is finished, a "done" dialog box will appear. The backup will come as a text file attached to an email.
The "Restore this pattern" button allows you to copy data from a backup file into your local database. There are two situations in which you might want to do this:
When you click the button, you'll be prompted for the backup file name and you can browse to it, OR click on the text box and paste the copied backup data into it.
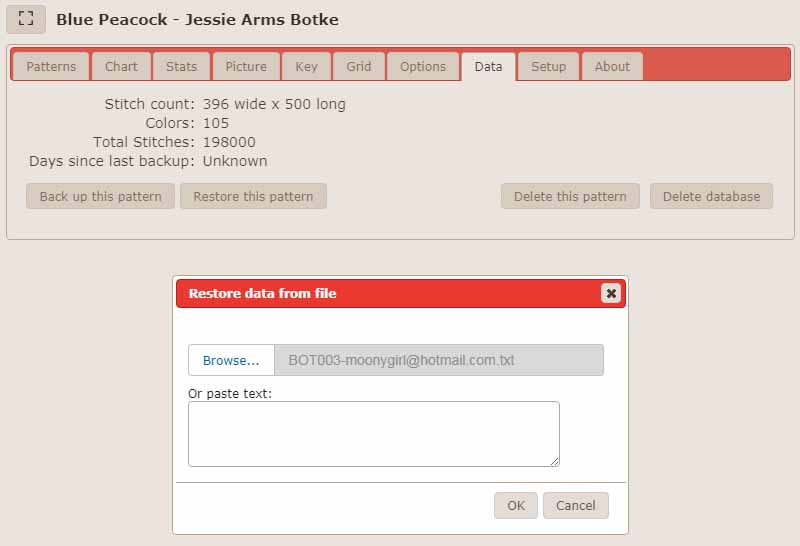
As with backup, the restore process will display a "wait" dialog reminding you to keep your device from sleeping, and then a "done" dialog when the process is complete.
Restore adds the data in the file to whatever data you already have on your device, if any. If there is data on your device that's not in the backup, it will not be cleared. For example, suppose you haven't set the grid line colors. If you make a backup, install the pattern on a different device, set grid line colors on the new device, and then restore the backup file, it will not overwrite the colors you set on the second device. Stitches that are marked complete on your device but that are not in the backup file will not be changed to "not done".
The "Delete this pattern" button completely removes the chart and your stitching data from the current device/browser.
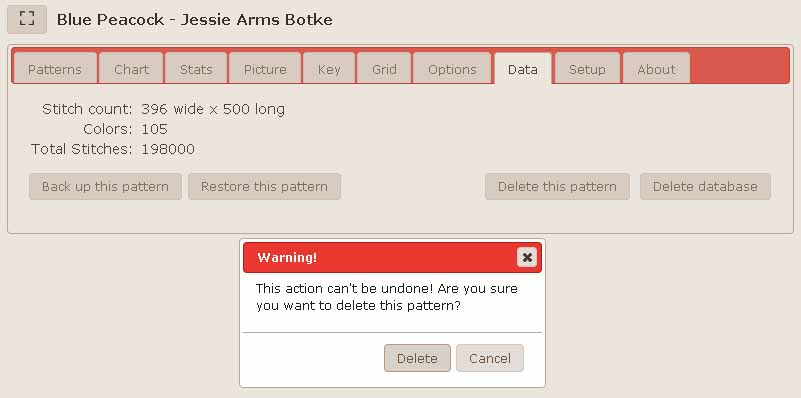
It will not be shown in the pattern list anymore. However, you still own the pattern, so if you click "Check for more" on the Patterns tab, it will reappear in the list and you can reinstall it if you wish. You would probably only delete a pattern if you were moving your stitching to a different device. Be sure you have done a backup and received the email first!
The "Delete database" button deletes all patterns. This option is primarily for testing and may be removed later, since deleting the last pattern also deletes all SQ Stitch related data.
The "about" tab provides access to the user manual and change log (and probably a FAQ later).
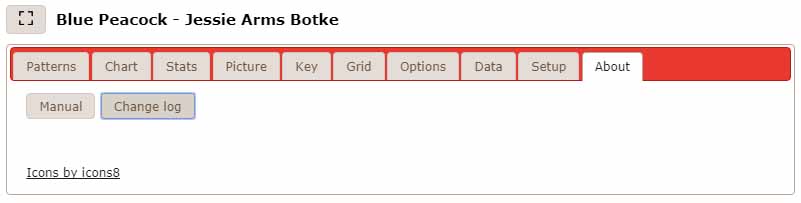
When you click on the "Manual" button, the manual opens in a new window (if the environment supports that). Your SQ Stitch session continues and you can position the windows next to each other for easy reference.
Similarly, the change log opens in a new window. It gives a summary of releases with release dates and a list of the changes in each version. When you notice a new version number on the SQ Stitch splash screen, it's a good idea to check the change log.