Cross Stitch Patterns from Fine Art by Scarlet Quince
 Cart 
 Wish list
     |     
     |     
Check out
     |     
     |     
Wholesale log in
Member services
Scarlet Quince
Goodies
Ramblings

Scarlet Quince Ramblings

Cross stitch ... art ... life

February 27th, 2020

Antialiasing is a technique used to add greater realism to a digital image, or in our case, a cross stitch pattern, by smoothing jagged edges on curved lines and diagonals. This is done by by adding intermediate colors. For example, suppose you create a simple pattern of a black circle on white.

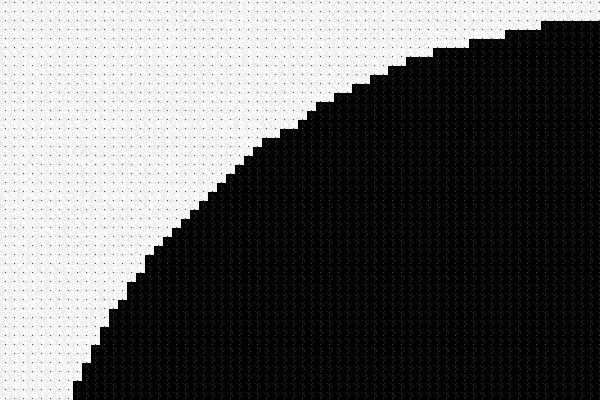
If you just use black and white, the pattern will look like this:

Antialiasing adds shades of gray to smooth out the jaggies. Now the pattern will look like this:

Much nicer!

Now when we are creating a pattern like this, we create it with a white background so that we get the antialiasing stitches, but then we take out all the white stitches, making them unstitched on the chart.  You’ll stitch light to dark gray stitches around the black area and it will make the black transition smoothly into the white fabric.  The pattern description will say “Background is not stitched.  White fabric recommended.”

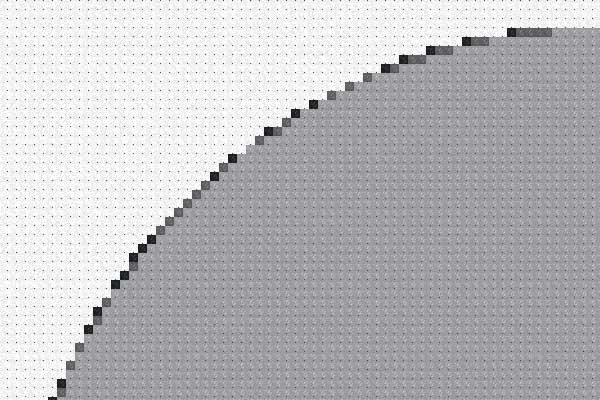
What happens if you don’t use white fabric?  Suppose you had some gray fabric around, and decided to use it instead.  Now the lightest stitches, that are supposed to fade nicely into the white fabric, stick out, like this:

Not the end of the world, but not what was intended either.

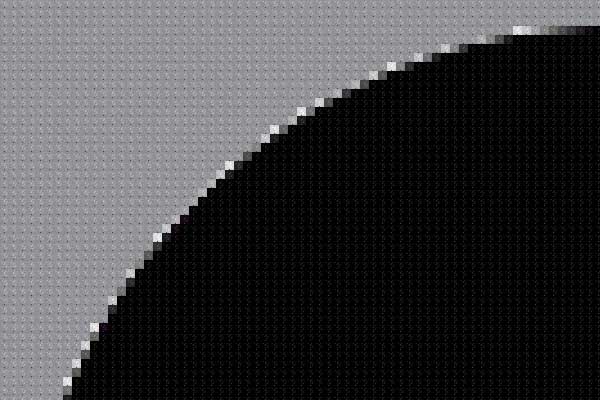
A more likely case — what if you buy a pattern that we say was designed to be stitched on black, but you don’t want to stitch on black? (We know stitching is harder on black fabric but if the original background in the picture was black or dark, we might design the pattern that way — the version of Girl With a Pearl Earring where the background is not stitched, for example.) Here’s what a pattern of a medium gray circle designed to be stitched on black fabric might look like:

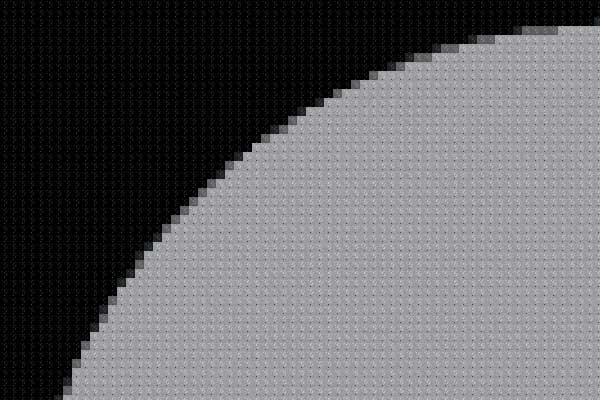
Notice that the antialiasing stitches are intermediate in color between the object and the fabric as before, but this time they’re darker shades of gray. Now, what if you stitch this on white fabric? It will look like this (and yes, these two pictures are identical except for the color of the background. Your perception of color is greatly affected by what it’s next to):

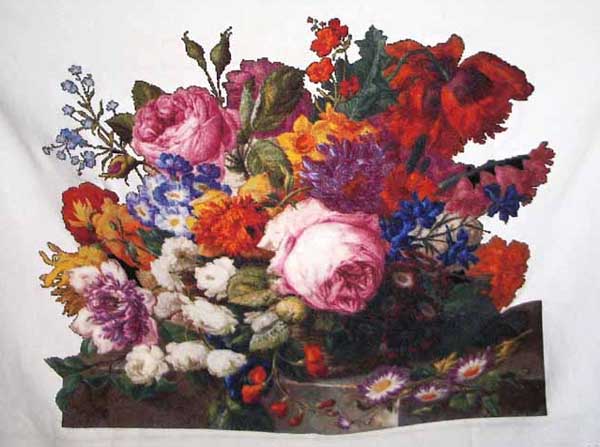
You might think that the dark border is kind of striking.  Here’s a picture from the gallery of Corbeille de Fleurs – Joseph Nigg.  This was the version of the pattern designed to be stitched on black, but the stitcher used white instead.  We think it looks pretty good!  You can see the dark border particularly around the yellow flowers on the left, but mostly it just makes the darker colors really pop.

If we start with an image that appears to be only two colors, such as Brer Rabbit – William Morris, antialiasing can increase the number of colors used in a confusing way. Here is the way the top left corner of Brer Rabbit looks in the fixed scale (larger) view:

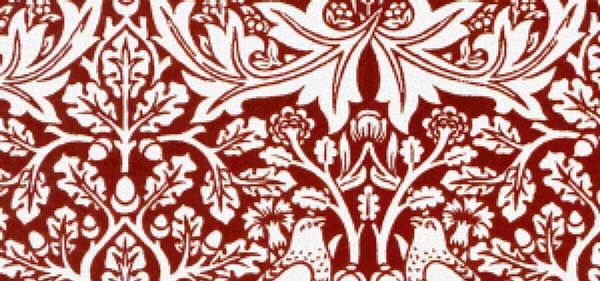
It looks like it’s two colors, but the pattern description says there are 28 colors. So people either say “I would like to do the two-color version” or they say “Where is the picture of the 28-color version?” Here is a greatly enlarged piece of the apparently two-color, actually 28-color pattern:

All those extra colors smooth out the curves and make it look like the original print. (BTW, this kind of fabric print is made by starting with red fabric and then bleaching areas to make the design. So in the original, the red is the background, but we thought it would be more fun to stitch red on white fabric (plus white fabric is readily available and the exact shade of red is not). The pattern description does state that the white areas are not stitched, and this doesn’t seem to be a point of confusion.)

There are other two color patterns, notably Souls being Received into the Heavenly Paradise – Edward Burne-Jones, which uses 23 colors, but apparently people expect a black and white picture to have some gray, and no one has ever asked about it. It seems to be more of a leap to think that a red and white picture should have some pink.

OK, I’m rambling now.


July 2nd, 2015

How do you store your floss? Not the floss for the current project, but all the leftover floss and leftover bits of blended colors from previous projects, or projects you were going to stitch but didn’t.

For a long time, I kept all my floss in a couple of boxes. I think there was some in a plastic grocery bag too. But I got tired of digging through an increasingly large pile of floss for colors that were supposed to be there but somehow weren’t (have you ever thought you bought 5 skeins of 430 but were finally forced to conclude that you bought 5 skeins of 431 instead?).

So I tried some other things. Here they are in the order I tried them (which is also, not coincidentally, in increasing order of cost).

I had someone who was going to stitch a model for me find that she couldn’t do it and send all the materials back to me, so I had a lot of baggies with partial skeins. I decided to put ALL my floss in baggies, stick one end of a paper clip through a corner of the bag as a hanger, and then thread the paper clip onto a wire coat hanger. I filled up a couple of coat hangers and hung them in the closet. (The total cost was whatever a box of baggies costs plus a box of paper clips.) It looked fairly tidy and was out of the way, but still readily accessible. It was sort of a poor-man’s version of Floss-Away bags on binder rings. Unfortunately, it turned out that the paper clips tangled with each other so the baggies didn’t stay in order and it was hard to find the color I was looking for (and still hard to know for sure that it was or wasn’t there).

Then a friend moved away and gave me a bunch of those Sterilite chests of drawers (the size that will hold 3 reams of paper and can be stacked). You can get them at Big Lots. OK, I didn’t pay anything for these but I think they’re about $5 each. I needed some for Scarlet Quince supplies (cover stock, paper, labels, etc.) and devoted 2 of them to floss. I labeled each drawer with a range of floss numbers (200-499, 500-799, 800-999, 3000-3399, 3600-3799, and 3800-3899). I still had to dig through a pile of floss to find a color, but the piles were smaller. (Yes, this picture is of the drawers labeled for SQ supplies, not for floss.)

That continued until our local needlework shop, Ginger’s, went out of business. She sold all her inventory and all the store fittings, including the racks where she hung all the DMC floss. I got dibs on the floss racks, measured them, and went home and measured the space I had in mind for them (below a counter in the family room that connects to the kitchen, originally set up as a bar). I hypnotized myself into believing they would fit there perfectly and called Ginger and told her they would fit my space and I’d be back for them. I brought them home and they were not at all close to fitting. For a long time I didn’t put them up anywhere because you don’t want a forest of 6″ hooks anywhere where someone might stumble into them in the dark.

Finally I did put them up against the counter after all but they stuck up above the counter some. One didn’t fit behind the counter so I put it on another wall. They were made to go on pegboard but I just hung them on nails. I knew the floss would get dusty out in the open and I planned to make a cover for it but that didn’t work out. Our couch is a couple of feet away from the wall so there’s an alleyway behind the couch where I can get at the floss but it’s not a high traffic area. Nevertheless, somehow people kept crashing into the racks (especially the one on the end) and knocking floss off or knocking the whole thing down. Finally I got enough of that. I didn’t get a picture of them while they were on the wall because MRA was so gung-ho to get going on my NEXT system, but you can see there’s a lot more storage capacity than any individual contributer really needs.

SO I bought a set of little drawers, one for each DMC color. There are 8 cabinets, each with 64 drawers. They’re made by Akro-Mils, part number 10164, and I got them on Amazon for $28.59 each and free shipping. Each cabinet is 20″ x 16″ x 6.5″. The drawers are 5.25″ long by 2″ wide and 1.5″ deep. They’re slightly too short for a skein of floss (it has to be curved a little to fit) and bobbins fit just fine. You can get maybe a dozen skeins in a drawer. There are 512 drawers and only 469 “normal” DMC colors (I’m excluding the variegated ones and rayon etc.) so I have some extra drawers for pearl cotton, needles, silks, beads, extra bobbins, etc.

I also made a set of floss labels for the drawers with the number and a big color swatch. (People have been asking for something like this for a while, and we will make them available as soon as I work out the RGB values for the 16 newest DMC colors.) The labels fit pretty well on the drawer pulls and the color swatches are really helpful because you don’t have to look at every number — you can jump to the next drawer with approximately the right color on the drawer pull.

I think this will be my last system. The cabinets are reasonably compact (they don’t stick out as far as the hooks), they are not going to fall off the wall, and the floss is protected from dust. If you wanted to be a little more frugal with your money or your space, you could have 2 or 3 colors per drawer.


June 22nd, 2015

I finished stitching my red alphabet about 5 years ago, and almost that long ago I bought the supplies for finishing it as a wall hanging, but only recently actually finished it. It came out pretty well. It’s not as flat as it ought to be and I hope some additional pressing will fix that. I had intended to write a tutorial on how to do this (not that the way I did it is the only way) but some things went wrong along the way that I can’t explain. Still, I can give you some pointers.

The first thing I did was fuse a sheet of fairly stiff Pellon to the back of the stitching. I had debated about whether I wanted to do this, but reasoned that if I decided it needed to come off, I could get it off again. Now I think that was the right choice because it will keep the stitching from sagging from its own weight. It was too big to block (on anything I had available) so I just went ahead and fused it. It didn’t come out 100% rectangular which made trimming the margins so they were all the same size tricky. I wanted to trim it so there was a 2″ border all the way around but because it was a little distorted in places, I couldn’t just measure 2″ from the edge of the stitching. I had to make marks at various places along the stitching and then draw a line that went through most of them. (I would have liked a larger border but the designer was seriously confused about how big each block would be and once I figured out what the real size would be, there wasn’t as much extra fabric as I had intended.)

In retrospect, I think I should have cut a paper pattern the size of the stitching, pinned it to the front of the fabric, and made sure that the edges and corners of pattern and stitching were aligned with each other, then fused it.

Next, I basted a piece of the backing/frame material (red and white ticking) to the back.

I decided to use 1/2″ seams to make calculating sizes easier. I chose 2″ for the frame width, which means, allowing for seams and the back of the frame, that the pattern pieces for the frame need to be 5″ wide. The frame pieces were shaped like this:

The end points should be right angles. The long side should be the same length as the side of the fabric (edge to edge). I folded the pattern in half to find the center and aligned the center with a line on the fabric. (It would be easier to use plain fabric. If you are stitching a cross-stitched picture, it would look better than patterned fabric anyway.)

To stitch the frame to a side, start 1/2″ away from the edge (or whatever you are using for the seam allowance) and end 1/2″ from the other edge. The seam allowances need to be free to make the miter. Be careful, when attaching an adjacent piece of the frame, not to stitch past the point where the stitching on the first piece ends. The 3 seams at each corner (horizontal, vertical, and diagonal) have to just meet. It’s better to have them not quite meet and fill in the hole by hand than have any of them cross. Only stitch from the corner close to the needlework to 1/2″ away from the point.

Now press the frame away from the stitching. Press under the seam allowances on the back, and fold each frame piece in half and press. For some reason I haven’t worked out, the back was too big! I had to trim the ends of the frame. I pressed under the seam allowances on the diagonals, whipstitched the edges of the frame to the back just over the seam line, and then stitched the diagonal seams at the corners.

I cut 2 4″ squares of the ticking, turned under opposite sides, and folded them in half and stitched the ends together to make tubes. I turned them inside out and fused them to the back corners of the stitching. It would have been better to make 3 (or even a continuous pocket) and to attach them to the top of the frame. Since they’re only fused, that’s easily corrected. You might want a rod at the bottom too to make it hang straight, and maybe attach a couple of curtain weights.

The fact that the lines in the ticking meet almost perfectly at the corners, is, I believe, dumb luck. Or “miracle” might be a better word. I think it is just an artifact of the size of the fabric and the spacing of the lines. I did envision that happening, but I don’t think I had any right to expect it.

I may make a small model and try to figure out my mistakes so that I can write a tutorial. I realize that this description is too vague for anyone but a pretty experienced sewer to be able to follow. I do like the “frameyness” of it with the mitered corners and the supplies were only about $10 instead of $x00 for having it professionally framed.

Another way you could do this would be to finish the needlework by itself, without a frame, and then make a backing piece as a separate piece and then join them. Get a piece of backing material for your stitching, and put the right sides together. Stitch just past your cross stitching on 3 sides, trim the seams, turn it right side out and press. Hand-finish the 4th side. Now do something similar with two pieces of framing/backing material to make a separate, larger, rectangular piece. Finally, attach the stitching to the larger frame piece. Or rather than sewing a backing to the cross stitch, you could just turn the edges under and then fuse it to your frame piece. No mitering, no patterns needed, and less sensitive to miscalculations. Just center the stitching piece on the underneath piece.


April 21st, 2015

A couple of people recommended the Dritz tailor’s marking set to me. I got one and have been using it for a while, and wanted to share my thoughts.

First, it’s a really nice product. It’s essentially a mechanical pencil with a soft grip. It uses ceramic leads (I don’t quite know what that means) and comes with 9, 3 each in white, green, and hot pink. They make very fine marks so it’s great for gridding. It has an eraser that removes the marks, but you can also remove them easily with a damp cloth. I have not had any trouble with the lines rubbing out before I’m finished with them. It will certainly last me the rest of my life, though lead refills are available. There’s plenty of eraser. It winds out when you twist the barrel of the pencil, and it’s about 1″ long. The refill package includes a new eraser.

The big disadvantage is that it’s pretty expensive for a marking pencil — you’ll pay $12-15, probably. However, when you consider what standard fabric markers are like, it’s probably worth it. Felt tip pen markers always seem to have dried up by the second time I use them. Fabric marking pencils (in my experience) somehow acquire numerous breaks in the lead, so that when you go to use them, you just have a jagged pencil end. You sharpen the pencil and then the next little segment falls out. Even if the lead isn’t broken, you can never get as fine a line as is possible with this pencil.

I looked at the reviews on Amazon. The people who didn’t like it said that little bits broke off every time they marked with it (I haven’t had that happen), or that it doesn’t leave a good mark on delicate fabric. I can imagine that since it’s a pretty hard lead, but on cross stitch fabric, it works fine.

Is it worth the money? Probably, depending on your finances. As you can tell, I had pretty much given up on fabric markers, but now that I am using it for my horizontal grid lines, instead of sewing them, it is saving me a lot of time. It’s true that conventional pencils cost a lot less, but you don’t have to use up very many of them sharpening them before you have spent as much as this one costs. And it’s worth pointing out that it is not expensive compared to a decent mechanical pencil, only compared to crummy fabric pencils.

Here’s what the lines look like on 22-count aida:


December 3rd, 2014

The US Postal Service has a tool to tell you when you need to mail things to ensure delivery by December 24. It depends on what part of the world you’re in and the class of postage you use. We use first class, priority, and priority express mail (your choice, subject to weight of the order). Please scroll down and read the weasel words though. These cutoffs are what should work in most cases, but the USPS is not guaranteeing anything. Last Christmas it took a priority mail package 10 days to reach us, when it should (supposedly) never be more than 3 days.


August 20th, 2014

We’ve upgraded our cover stock. Until recently, we were using 60 pound card stock (which has a matte finish). We are now using 69 pound glossy paper, which we think is a big improvement. The colors are more vibrant and saturated, and while I don’t believe that the card stock actually showed less detail, it didn’t show up as clearly. We had always assumed that if the printer has a setting for card stock, and you PICK the setting for card stock, the printer will use the perfect amount of ink for card stock, but apparently not. Or maybe there is no perfect amount. When we tried glossy paper, we were really astonished at the difference. Here are a couple of examples to give you an idea.

Old
New

Old
New

We hope you’ll like this change!


August 20th, 2014

You may know that DMC has, over some period of time, changed some of their dye formulas. I believe this has mostly been done to bring them into line with changing regulations on toxic materials in dyes, but they say it can also happen if the availability of raw materials changes. The result is that some of the colors are different than they used to be. A few colors ended up being so close to another color that they “merged” the colors. They don’t say they discontinued any colors; they just print two numbers of the labels of 7 colors of floss. You can read more about that here.

The obvious question is, which colors are different than they were 12 years ago, and how different are they? I couldn’t get an answer. The solution seemed to be to get a brand-new skein of each color. Going to Michael’s and picking out all that floss sounded time-consuming and expensive, plus there’s no way to know how old their stock is. I’m sure our local Michael’s turns over their stock regularly, but how long has it been sitting in the warehouse?

It turns out that DMC has a designer program, in which they will provide designers who use DMC materials all the free floss and fabric they need for models or whatever purposes they may have. So I applied and was accepted and requested one skein of each color, including their 16 newest colors. (These new colors come only in a set currently. DMC says they will be available in open stock “in a couple of years”. We will not be using them in our patterns until you can buy only what you need — imagine if you needed 4 skeins of one of the new colors and had to buy 4 sets!)

They came yesterday.

Now begins the lengthy task of, first, determining which colors have changed; second, working out new RGB values (computer color definitions) for them; and third, modifiying the patterns that are affected. I hope that most of the changes will be minor. In any case, because most colors in our patterns are blends, and not used in large solid areas, the impact on our patterns should be slight. In other words, go ahead and stitch the patterns you have with the floss you have, or new floss, and don’t worry about the outcome.

By the way, there are a number of DMC colors (about 25 I think) that were new several years ago that we have never added. We will be adding those colors, now, as well.


June 29th, 2014

Today is my mother’s birthday and in her honor I’m making a rhubarb pie, which was a pie she often made. She grew rhubarb in our yard and we ate a LOT of rhubarb (mostly stewed, with the odd pie). I believe that she only had 3 plants so I don’t quite know how there could have been the enormous amounts of rhubarb I remember.

I have her cookbook which she bought on her honeymoon.

I’ve modified her recipe slightly. It only called for 2 cups of rhubarb and I like more filling than that in my pies, so I use 4 cups. I didn’t double the sugar, though, because I like my pie a little tarter than the original recipe made, so I went from 1 cup of sugar to 1 1/2. Everything else is the same.

Cut up 4 cups of rhubarb into small pieces.

Put the rhubarb into a mixing bowl. Mix 1 1/2 cups of sugar with 3 T of flour. Break an egg into the bowl of rhubarb, stir, then add the sugar-flour mixture and mix thoroughly.

Prepare 2 9″ crusts. I spent a long time learning to make flaky pie crust but now I use the Pillsbury crusts that come rolled up in the refrigerator roll section. They are very good if you roll them out a little bigger and thinner, AND if you don’t keep them in the freezer so long that they get freezer-burned (oops). (This also allows you to make almost as much mess as if you were making pie crust from scratch.) I enjoy using my mother’s rolling pin and a pie plate my sister gave her.

If you want to make your own crust, here’s how I do it. Put 2 cups of flour and 1 teaspoon of salt in the work bowl of a food processor, along with the steel knife. Put the whole thing in the freezer. Put about 3/4 cup of shortening in a measuring cup and put it in the freezer until it’s mostly hard. Cut the shortening into chunks, add to the food processor, and process until you have small crumbs. Don’t go on and on or the shortening will warm up and the bits will start to get larger. Dump the mixture into a mixing bowl and add 6 T of ice water. Stir with a fork until it forms a ball. Divide into 2 pieces (the one for the bottom can be a little larger than the piece for the top). To roll, form the dough into a thick cookie. Roll from the center out in all directions, patching any cracks that start to form before they get too big. Flip the crust over before it gets too big and keep rolling until it’s the right size.

Fold the pie crust in half and lift it into the pie plate.

Then open it up and make sure it’s centered. Pour in the filling. The rhubarb gives off a lot of juice and just in the short time it has been standing, a lot of the sugar has dissolved. Sometimes I let it stand for an hour or so, stirring occasionally, until it all dissolves. I can’t give any good reason for doing that.

Roll out the other crust. Moisten the lip of the bottom crust all the way around, then fold the top crust in half and put it on top. Press around the rim to seal the pie. If there’s excess dough, trim it so it’s even. Go around the pie folding the cut edge of the crust to the outside.

Then crimp it with your fingers and cut some slits or a fancy R. It’s a good idea to press the crimp against the pie plate here and there to keep the top crust from shrinking down. I forgot to do that.

Bake in an oven preheated to 425 for 10 minutes, then reduce the heat to 350, and give it another 30 or 40 minutes. The pie is done when you can see the filling bubbling.

Another thing my mother used to do when we were small was make what I call pie crust sticks. Roll out the leftover dough into some sort of oval or rectangle and sprinkle half of it with sugar and cinnamon. (She used to add pats of butter to the filling, which probably made the sugar melt better, but I don’t do that.)

Fold the other half over the filling. Put it on a baking sheet and cut into sticks. These will be done around the time you need to turn the oven down.

Happy birthday, Mom!


December 9th, 2013

OK, so maybe no astronauts, but I do have an ancient UFO!

This was a stamped fabric kit put out by National Paragon Corporation in 1978 including “Peri-Lusta” Filo floss (which is in the vintage category now), and I was given it right around that time. It was SO long ago that I can’t remember who gave it to me. It’s based on a sampler in the Cooper Hewitt Museum which was stitched in 1773. I never cared for the colors. They don’t seem samplerish (by which I guess I mean not historically accurate) to me.

I did all the cross stitch and lettering (which is stem stitch where it isn’t cross stitch) in maybe 2 or 3 years. (Or could be less — it shouldn’t have taken very long — but I don’t remember.) Then I ran into the bottom which is mostly satin and long-and-short stitch, which I dislike intensely. So I put it away and worked on it intermittently, eventually just taking it along on trips because I didn’t care if it got dirty. It has been to west Texas a good many times, and I can tell you that stitching in the car is not helpful to your eyes OR the work. I finished it in May, 35 years after I started it, and finished signing it last night.

I used Transfer-Eze for the signature. It’s a sort of fuzzy sheet with a backing. You print out whatever it is you want to transfer on a computer printer, or I suppose you could draw on it, then peel off the backing and stick the stuff to your fabric. Then you stitch over the lines. When you’re done, it dissolves in water and the marks which were never actually on your fabric go with it. Pretty cool!

I washed it today and boy was it dirty. Now that it is clean and pressed and FINISHED, I feel more kindly toward it. I still don’t know that I will frame it — it’s very large and the colors don’t go with anything, so it will probably join its compatriots in my bottom drawer but I don’t hate it any more. I got curious about the original and found it on the Cooper Hewitt website.

It’s silk embroidery on linen and uses satin, cross, half-cross, eyelet, rococo, chain, and roumanian stitches. (The kit didn’t have all those.) Obviously, it’s faded, and perhaps dirty, but the colors were obviously subtler even to begin with.

It was a great day for me when people stopped giving me kits…


September 17th, 2013

Sandy was a feral cat who lived in our yard and garage (we adjusted the door so it didn’t close all the way so that the wild cats could get in to eat and be out of the weather). He was almost white, with pinkish Siamese markings and blue eyes.

He knew exactly when it was mealtime and was always there waiting. He was very friendly and loved to bump his head against your legs, the other cats, car tires, you name it, and when he bumped you, you stayed bumped. Brindle Cat just wanted to eat but his top priority was bumping and sometimes she could hardly keep her head over the dish.

He liked to sleep on the roof of my car and often when I pulled out a cloud of cat hair would blow off. Many times there were cat footprints sliding down the windshield. In the winter he slept on a ratty old bathmat that had made it just past the door at the back of the garage and no farther. We never saw him on it but it would be warm when we touched it and Sandy would be going away. MRA began to worry that he needed more protection from the cold one winter and bought him a nice cat nest, but Sandy wouldn’t sleep in it until we put the dirty old bathmat into it.

He was almost always around somewhere, sleeping in the side yard, rolling on the sidewalk, resting on the porch, or waiting outside the garage for his late night meal, and the sight of him always made me smile.

But it has been over a week since we have seen him, and we’ve come to the conclusion that something has happened to him, as things do with outdoor cats. We’ll probably never know what and maybe that’s just as well. My head accepts it but my heart keeps hoping to catch a glimpse of a little white cat.

Sleep well, Sandy.


Privacy policy | Return policy | Site map | Member services | Contact us | Help
Copyright © 2002-2024 Scarlet Quince, LLC. All rights reserved.
You are welcome to link to this page but you may not use words or pictures on another site without written permission.